Installing Windows on newer MacBooks with no optical drive is almost a breeze, all you need is a USB drive to get things done. On older MacBooks that ship with optical drives, this luxury is unavailable. A Windows installation DVD is required and it gets worse if your optical drive is damaged and won’t read the disk. An external drive might not work and mounting an ISO most likely won’t work too. Also, if you have a bootable Windows 10 USB drive, you might still be out of luck.
Over weekend, I had to partition a MacBook Pro and install Windows through Bootcamp. The damaged optical drive was a setback and a bootable Windows 10 installation USB drive didn’t work. Of course, I tried manually creating a partition using Disk Utility, but booting from USB to carry out the operation didn’t work.
Here are the things you need to do make this work:
- Disabling System Integrity Protection from Recovery
- Downloading Windows 10 ISO from Microsoft
- Editing a certain preference list file to allow installation from USB
Disabling System Integrity Protection
Before you do this, you should know that it leaves your computer vulnerable. However, it needs to be disabled so we can modify a certain system file to get this whole thing to work. Unless you’re going to be modifying system files a whole lot, it’s best to keep this feature enabled.
To disable System Integrity Protection:
- Reboot your MacBook and hold down CMD + R buttons until a progress bar appears under the boot logo.
- Now go to Utilities > Terminal

- Type csrutil disable and System Integrity Protection should be disabled already.
Restart your MacBook and move on to the second step. By the way, whenever you want to re-enable this feature, follow these steps and type csrutil enable instead.
Downloading Windows 10 ISO from Microsoft
Visit this page and download the ISO image directly from Microsoft. You won’t see the right option if you’re checking with a Windows PC. You should visit the page with any non-Microsoft operating system.
Editing Boot Camp info.plist
1.Go to Finder > Applications > Utilities.
2. *Right-click* on Boot Camp Assistant and select Show Package Contents.

3. Open Content and edit info.plist. You need to make a copy of the file and save somewhere else before you can do this. It’s important to backup this file to another safe location in case something goes wrong. You only need to make two changes here:
i. Find PreUSBBootSupportedModels and change to just USBBootSupportedModels.
ii. In the strings that follow, add the model identifier of your MacBook to look like this: <string>MacBookPro8,1</string>. You can find the correct model identifier by going to Apple Menu > About This Mac > More Info > System Report.
iii. Also find Win7OnlyModels and be sure your model is not listed. Remove from the list if you see it.
4. After editing the duplicated file, drag back to the Boot Camp Assistant content folder to replace the original file.
If you go back to Boot Camp now, you should see three options listed.
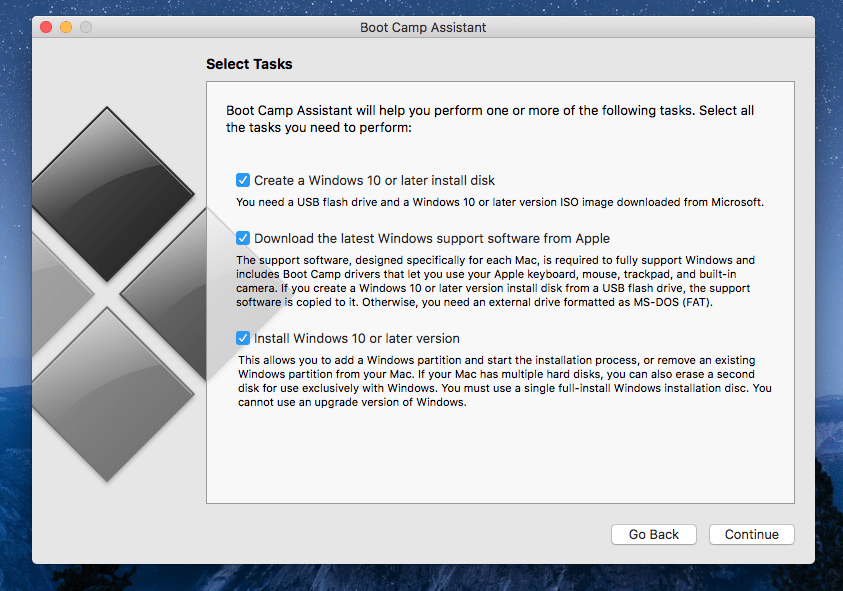
You should now be able to create a bootable USB drive with the ISO file you downloaded. This may take a long while before the process completes.
Pressing ALT/OPTION at boot should present the option to choose your boot device. Select EFI Boot and you should be good to go.
Known Issue
When you’re finally set to install Windows and get to the part where available partitions are shown, selecting the previously created Boot Camp partition may result in this error:
Windows cannot be installed to this disk. The selected disk has an MBR partition table. On EFI systems, Windows can only be installed to GPT disks.
This brilliant article on Mac Riot gives an easy way to solve it.
Note: Installing Windows with EFI boot on certain lead to issues. For example on MBP 2011, an EFI Windows 10 install gives no sound even when the driver is successfully installed.


